HITCON 2023 – The Blade
Beginner-friendly writeup for a nifty Rust reversing challenge.
This writeup is also intended for beginners. Anytime there's a set of questions, feel free to pause, challenge yourself, and think through them. :) If you want to follow along, you can grab the challenge binary here.
I'll be mainly using ghidra as my decompiler, along with GDB + GEF. For those unfamiliar with GDB, you may find my recently posted cheatsheet helpful.
My first Rust rev solve! Though in hindsight, not much Rust knowledge was needed.
Description
A Rust tool for executing shellcode in a seccomp environment. Your goal is to pass the hidden flag checker concealed in the binary.
Author: wxrdnx
40/683 solves.
Writeup
Running the Server
Let’s start by running the binary. We can get a feel by navigating the program with help and other commands.
Turns out we’re given a C2 (Command and Control) interface which sends shellcode. Imagine we control a compromised machine. By running a malicious shellcode, we can trigger a reverse shell to our server, so that we can easily send more commands from the server.
Anyhow, we can start the server with:
We’re told to run some shellcode on the “client”. By default, this starts a connection to localhost:4444.
- A simple alternative is to run
nc localhost 4444(on a separate shell). This will initiate a connection to the server, but it won’t have the same effect as the shellcode. - To run the shellcode, we can compile a simple C program containing the shellcode and execute it.
After running, then what? The commands don’t seem to reveal much, and at this point it’s a bit guessy. Time to turn to a decompiler.
Identifying Interest Points
- What command triggers the flag checker?
- Where is the flag processed?
- How is the flag processed?
According to the description, the program contains a flag checker. So presumably we pass the flag as input at some point. But where and how?
By running strings, we find an interesting set of strings: ?flag, ?help, ?exit, ?quit. This pattern can’t be a coincidence.
In your favourite decompiler, do a search for the bytes ?flag. If you can’t find it, try playing with endian settings. This should lead you to seccomp_shell::shell::prompt().
Under a condition checking for flag, we’re led to seccomp_shell::shell::verify().
Although strings shows ?flag as the full string, the actual string is just flag. Questionable, no? This is because the byte before flag happens to be \x22 (i.e. ?). strings doesn’t know better, because it doesn’t actually disassemble the program.
So how is the flag actually processed? This requires a careful study of verify(), with a touch of dynamic analysis and experimentation.
Like most flag checkers, it turns out we just pass the flag as input (alongside the flag command).
And like most flag checkers, we’re immediately hit with “Incorrect”.
We also get some hints about the flag's length...
...by glancing at the start of verify()...
...64.
When we try sending a flag 64-bytes long, we get something on our other shell. We're not immediately hit with an "Incorrect".
Reversing the Encryption
Time to play the UNO reverse card on this binary!
- There are 3 parts to the encryption. What addresses do they begin and end?
- What is each part doing?
Let’s recognise some high level patterns.
It’s easy to be intimidated by the multitude of loops; but really, half the loops are the same, just wearing different clothes.
There are the 3 parts to the encryption:
- Part 1 (
112d10–113017). - Part 2 (
113020–11309c). - Part 3 (
11310e–1133a5).
The procedure is roughly:
1. Reversing the Permutation
Address: 112d10 – 113017.
Eight loops, doing pretty much the same thing. Let’s focus on the first one.
(Some variables are renamed for clarity.)
Does this look familiar?
It’s good ol’ swap! (Though slightly unrolled.) There are eight of these loops, the only difference being the memcpy source.
So how do we reverse this? Generally, there are two approaches to take:
- Static analysis. This means we reverse the binary by looking at the bytecode, assembly, decompiler, etc. We don't run or emulate anything.
- Dynamic analysis. In this approach, we observe the program's behaviour by running it. Common tools are
gdb,strace, andltrace.
Approaching this statically seems faster, but integer semantics may get lost in translation. Our conclusion may be unstable.
Thus, for fun (and practice), we'll go the dynamic route. Let's insert some breakpoints, input our flag of 64 unique characters (e.g. Base64 alphabet), grab the permuted string, and construct a mapping.
In GDB:
All that's left is to match the characters.
First part done!
2. Constructing An Inverse Map
Address: 113020 – 11309c.
Part 2 Decompile
If we reverse this statically, it seems like we get a one-to-one mapping of sorts... almost a bijection... but perhaps our implementation is wrong? Better check it with dynamic analysis. 🫠
By "mapping", I mean values are transformed and mapped from one value to another. For example, a (0x61) is mapped to u (0x75), while b (0x62) is mapped to q (0x71).
Like before, we could reverse this part statically... but overflow and types are tricky to get right. So we'll go dynamic again!
Let's start with some basic GDB analysis:
- What breakpoints should we add to check the result of one map iteration?
- What memory location should we examine?
- (And after all that, can you derive the mapping function?)
Oh where to go?
We'll break after the loop, at 11309e.
As for memory location, the code still modifies __ptr, so we'll read from the same location.
Two things I'd like to point out:
Previously, we used
x/sto print a string from memory. This time, I usedx/16wxto print bytes, since some mapped bytes aren't printable.1There's another problem... previously, we input the bytes through
flag <bytes>, and this is great if we're using printable chars. But what about non-printable chars? There are different solutions around this:- Employ GDB input tricks.
- Track cycles of characters.
- Break before mapping, and hard-code
__ptrby modifying its memory. Since the goal is to discover the remaining mappings, we'll hard-code__ptrwith the rest of the bytes outside our Base64 alphabet.
Y'know what? Let's go with the last option!
Finished gathering data? Let's analyse it!
And just like that, we obtained a reverse mapping, thanks to it being a bijection!
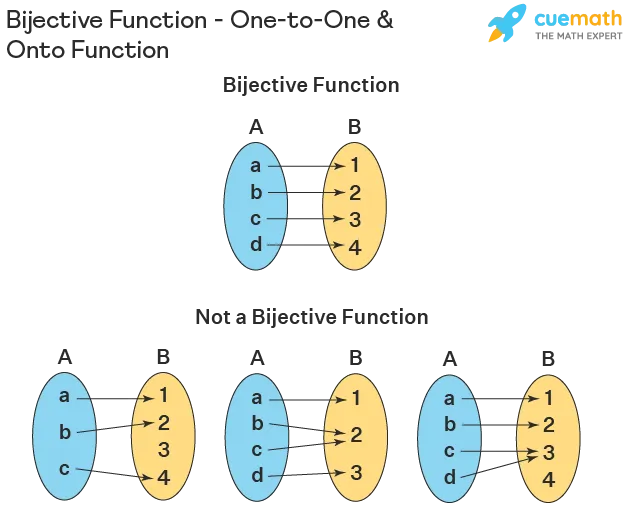
What is a bijection?
A bijection is a function where...
- each input maps to a unique output. (injective)
- each possible output is mapped from a corresponding input. Specifically, every value in the function's range has a mapping. (surjective)
This characteristic is crucial as it guarantees an invertible operation.
3. Cracking the Shellcode
Address: 11310e – 1133a5.
The final part. Subtle, but delectable.
What are the 255 bytes copied into the Rust
vec?What is the purpose of the data loaded at
11310e?
The 255 bytes loaded into a vec? Guess what? That also happens to be a shellcode!
- Follow-up question: if this is shellcode, what does it do? how is it run?
We can disassemble it with pwntools.disasm to get the following ASM.
Small caveat: you'll want to set context.arch = 'amd64' for disasm to interpret the shellcode correctly. In the disassembly, we see our two points of insertion (0xdeadbeef) treated as values, so amd64 is probably the right choice.
I've included the juiciest part above (with some annotations). Essentially, we perform several reversible operations (add, xor, ror, not) on 4 bytes of input; and the result is checked against 4 bytes of static data. Finally, it sets rax = 1 if correct, and rax = 0 if false.
But are we actually comparing 0xdeadbeef. Nope—we're comparing something else instead.
- What are the two
0xdeadbeefbeing replaced with?
The Guts: What does the shellcode load?
Here is some (simplified) code which overwrites 0xdeadbeef values at instruction 113168. Remember, vec is the shellcode and __ptr is our permuted + mapped input.
Does 0xA7, 0x51, 0x68, and 0x52 look familiar? 🙃 Check the wall of bytes in 11310e.
Effectively, the Rust performs a little surgery on shellcode before using it.
But how is it used? Leafing around the decompiled code, you may notice Rust IO write and read functions... those seem sus...
By now, you probably know what the shellcode does: flag-checking. But there are a few more things we need to reverse...
In the calculations, three mystery values (r12, r13, r14) are used. These were computed in the preceding shellcode. To efficiently obtain our flag input from the expected output, we need to find out what these mystery values are.
In case you'd like to have a stab at dissecting the assembly, the full (unblemished) shellcode is in the box below. Try to figure out what r12, r13, and r14 are!
- If you're stuck, try using GDB on our shellcode program (main.c from Running the Server) with watchpoints.
- Important: the shellcode we saw when starting the server is different from the shellcode we're reversing here! The former acts as a client, receiving commands and executing them. The latter is a flag-checker payload that is sent to the client over the network.
- Here's a useful list of Linux x86-64 syscalls: filippo.io: Linux Syscall Table.
Full Shellcode
Have fun! :)
It turns out r12 and r13 are just the first 4 bytes of /bin/sh and /etc/passwd, which is respectively \x7fELF and root. These correspond to 0x464c457f and 0x746f6f72 in little endian. And r14 is just 0x31f3831f, computed with a bit of arithmetic. Armed with these 3 values, we can now reverse the encryption.
Tying it All Together
All that's left is to tie the three parts together.
Debugging Our Mess
Some small tips on debugging.
Sometimes the solution is simple and straightforward. But occasionally, we make programming mistakes or misunderstand the problem. Debugging code can be painful.
Prove inverse function holds. Sounds mathy, but the basic principle is to check if our reversed output equals our input. In math terms:
f(g(x)) = g(f(x)) = x, wheregis the inverse off. If it's not equal, clearly we messed up somewhere.- This is useful for the second part (mapping), because our domain is small, just 0 - 255.
- For example, with shellcode encryption, we can do a forward pass, to make sure we're getting the same data.
Use
asserts. Great for intermediate checks.Verify assumptions with dynamic analysis. For example, I had falsely assumed in the shellcode that
r12 == 0, since seemed to be pushed by the assembly. But as we found out,r12 == L"FLE\x7f". However, be wary of the observer effect, where the program changes behaviour when observed. I haven't seen this much in CTFs, but it's certain to be out there...
Final Remarks
It's easy to miss things out. I know I did. Lots of hair was lost until I realised I left out the shellcode. I also tried to search the shellcode on ExploitDB, but no luck, because it was hand-spun.
But overall, a sweet challenge. And one that left me with nice rave music to power me through Saturday.
Solve Script
Flag
(I don't know what this music was. It was my first time listening to it. And it's epic! So thank you, wxrdnx, for introducing this nice rave and meme.)
Footnotes
A better specifier would be
x/64bd. This displays 64decimalbytes, and is more convenient to parse in Python. But I chosex/16wxsince I didn't know better at the time and caused myself extra pain. 🥲 ↩︎
Comments are back! Privacy-focused, without ads, bloatware 🤮, and trackers. Be one of the first to contribute to the discussion — I'd love to hear your thoughts.


![Thumbnail for N[Subtype Metaprogramming] is N[Mostly Harmless]](/img/posts/programming/concepts/subtype-metaprogramming/assets/thumbnail-512w.webp)

